Love in the Kitchen - making fast, healthy, homegrown meals you'll enjoy

Saturday, July 31, 2010

Follow Me Friday (on Saturday?)

I thought I would try this "follow me friday" thing.  I was supposed to take pictures of what I did all day (which I mostly did) and then post them.  Which I am, just a day late.  Whatever.


Anyway, our days have been starting early.  This is about 5:30 AM.  You'll have to excuse the next few pictures.  Because it is 5:30 AM, and zentMRS does not do 5:30 AM with much grace.


Clearly still tired.  

Morgan, on the other hand, can't wait to play with mousie.  It is his favorite morning thing.  Except breakfast.  Breakfast (and dinner, and second dinner) rule over all.


This is what I wore.  Except you can't see it because of the flash.  Never mind.  Casual Friday wear.

This is what it looked like when I got to work.  Across the street is San Diego Bay.  Somewhere through the clouds is Point Loma.  


This is breakfast.


Still cloudy when heading out for lunch.

Rubios!  One of my favorite lunches!  We had a health mex chicken burrito and a mahi taco.  Yum.


Stopped at Home Depot after lunch.  Just to wander.


I had to leave work early to go to the memorial service for a neighbor.  Her son (our crazy neighbor... and a story for a different day) asked me to take pictures.  Which I thought was odd, but I did it anyway.


Then I picked up The Mr.  We carpool.  He had a meeting and couldn't make the crazy neighbor's mom's memorial service.  


We went to the Farmer's Market in Mission Valley.  We hate the Valley.  Because of the traffic.

But we like our CSA box, and the Valley is where we pick it up.


Then a bunch of things happened.  We drove home, put away produce, made dinner, cleaned up after dinner, and watched "Yes Man" which was very funny.  "Red Bull"  I didn't get pictures of any of those things.

Then we decided to go to Target.  Don't we live on the edge?


We found some of The Mr's The Boy's favorite things.


But all we bought was some yogurt, a shirt and some gum.


We have The Children this weekend.  The Boy was at camp (we actually picked him up Saturday morning) and we picked The Girl up at her church.  She was getting ready for a 30 hour famine and a rummage sale.


Then we drove home.


The end.


Zentmrs Pin It

Friday, July 30, 2010

Green Chicken Curry

The Mr and I love "The Next Food Network Star".  We first watched in season two, when Guy Fieri was the winner.  (We love Guy too!)  We enjoyed seeing Aaron McCargo Jr. win in season 4 (not sure where we were for season 3) and couldn't decide between Melissa d'Arabian and Jeffrey when it came down to the finals.  Not that it mattered because we aren't the judges.  Though I wish I could cook like Bobby Flay.

Anyway.  Last season we watched a couple of episodes from which we really wished  they would have posted recipes.  Kelsey's white chocolate macadamia nut fish and Melissa's chili pepper dish.

This season they are posting recipes!  Yea!  This one, from Aarti Sequeria, looked great on television and we just had to try it.


(My own recipe has a few modifications - I use parsley instead of cilantro because I don't like cilantro... and chicken breasts because we have chicken breasts and not thighs in our freezer)


Green Chicken Curry

Ingredients

  • 2 small bunches cilantro leaves, coarsely chopped, 1 1/2 cups

  • 1 bunch fresh mint, leaves, coarsely chopped, 1 1/2 cups

  • 1 red onion, chopped

  • 6 cloves garlic

  • 1 1/2-inch piece ginger, peeled and coarsely chopped

  • Kosher salt and freshly ground black pepper

  • 1/4 cup water, plus 1 1/2 cups

  • 2 tablespoons olive oil

  • 2 shallots, thinly sliced

  • 2 teaspoons ground cumin

  • 1 teaspoon ground coriander

  • 1/2 teaspoon garam masala

  • 1/2 teaspoon ground turmeric

  • 6 boneless, skinless chicken thighs, about 1 3/4 pounds, halved

  • 1/2 teaspoon malt vinegar

  • 1/4 cup plain whole milk yogurt, whisked until smooth

  • Cooked basmati rice or warm naan bread, for serving


    Directions
    Add the cilantro, mint, red onion, garlic, ginger, and salt, and pepper, to taste, to a food processor or blender. Puree on high until smooth. With the processor running, add about 1/4 cup water, and blend until the mixture is the consistency of a thick paste, a.k.a. "masala". Set aside.

    In a large pot or deep skillet heat the olive oil over medium heat until shimmering. Add the shallot and cook, stirring often, until golden brown.

    Add the spices and cook for 30 seconds. Pour the masala mixture into skillet and cook, stirring often until it deepens in color and aroma. You'll know it's ready when it looks shiny, little droplets of oil will appear on the surface, and the masala will hold together as a cohesive mass.

    Add the chicken, coating every piece in the masala and stirring often. Continue to cook for 5 minutes, so that the masala really adheres to the chicken. Add about 1 1/2 cups water, just enough to cover the chicken, and the vinegar. Bring to a boil, and then reduce the heat and simmer, uncovered, until the chicken is tender and sauce has thickened slightly, about 20 to 25 minutes.

    Remove the pan from heat and stir in the yogurt. Taste and adjust seasonings, if needed. Transfer the mixture to a serving dish and serve over rice or with warm naan bread.


    Looks delicious, doesn't it?!  


    *recipe and images from foodnetwork.com


    For more great recipes, check out The Grocery Cart Challenge Recipe Swap! If you have a recipe to share, please join in the fun!


    Zentmrs
  • Pin It

    Thursday, July 29, 2010

    Before and After

    I never used to do any post-processing on my photos. Good photographers don't need post-processing for amazing photos.

    Then I went to an Ansel Adams exhibit. I learned that Ansel Adams spent a lot of time working with his shots, making sure he had the right light, the right exposure, and the right subject for his photos. And then, he spent a lot of time processing his film to show exactly what he wanted to show.

    I figured, if he did, it must be OK, and have started to learn about post-processing.

    We took this shot with our Canon Rebel XTi, with our 70-200mm 2.8 lens (awesome lens by the way).

    This is my before picture. Beautiful sunset. I like the silhouette of the palm tree.  But in real life, the sunset was much more vibrant.


    So, using Adobe Elements, I played with the light and color a little bit, and added a red filter. It was my first time using a filter - thought it worked pretty well. This is much more like the picture in my head of the sunset that we saw.


    If you like my shots, you need to visit Pixel Perfect for more before and after fun! And if you want to play along all you have to do is show us your SOOC (straight out of camera) shot and then the edited version. Link back to Pixel Perfect and link up your post below! Feel free to share with us your editing program and camera gear too!


    Zentmrs Pin It

    Wednesday, July 28, 2010

    Wednesday - from the Webcam

    We love hanging out in the backyard watching the birds and enjoying the plants, flowers and new pond we have.

    Unfortnately we have to work.  I know.  Unlike the rest of the world, right?

    So we have a couple of webcams that hang out in the backyard for us, and give us a glimpse of what we would see if we were there.  Here's a sample of what they captured lately:


    One of our favorites - a hummingbird (in the lower left)


    This one is a bit tough to pick out, but I thought it was cool that I happened to click on the camera when it happened - a bird flies by at the bottom of the image, right in the middle.  (To see it look at bottom of image, the bird has its wings spread, is in line with the pole, he is flying left over the roses)

    Here's a bunny in the lower part of the image... pre-critter guard...


    Another hummingbird.  Or maybe the same one.  He is very territorial.


    A mourning dove flies down.


    Bunny again.  With more birds on a new feeder.


    Not a hummingbird.  Boy the humminbird gets mad when these little finches sit on his feeder.  He'll dive at the finches, hover and screech.  Then go back to his tree.  Then dive and screech.  Until the finch finally goes away.


    I think the finch knows we are watching.


    Finally he gets his feeder back.


    This guy flies right through!


    Hope you enjoyed our backyard glimpses!

    Zentmrs Pin It

    Tuesday, July 27, 2010

    Tuesday Garden Party - Secrets from The Mr for a Beautiful Garden

    **Thoughts from The Mr:

    So the Mrs. asked me to pen a guest blog about irrigation. Unfortnuately (for you), I don’t have her wit, brevity, or ability to use spell check. Still, I will do my best.

    When we recently spent a week away from our home, we realized that one can go a long way towards having a green thumb by first having a wet thumb.  Plants mostly want light and water, and, if you’re anything like me, it’s far too easy to provide the former and neglect the latter. That’s where your local home improvement superstore (or neighborhood hardware store, for that matter) can help...with automatic irrigation!  Being an engineer, I’ll break irrigation down into arbitrary and meaningless categories
    1. Boring prerequisite stuff
    2. Timing devices
    3. The water “backbone” (I’d love to have a better title)
    4. Drippers, misters, and emitters...oh my!
    5. Tune up
    Boring Prerequisite Stuff
    First of all, there are likely to be many “code” requirements for irrigation systems of which I am unaware.  Unless you have a particularly nasty homeowners association, it seems pretty unlikely that you’ll fall victim to the irrigation police.  Still, it’s wise to understand if your neighborhood/city/state/region have any specific irrigation regulations of which they are particularly fond.


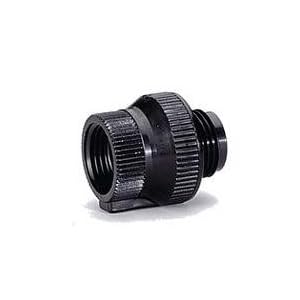
    From first principles, the regulations mostly center around making sure that it’s not possible for water from your plants to inadvertently make its way back into the water main in the event of a loss of water main pressure.  So, get yourself a backflow preventer (http://www.amazon.com/EnviroDrip-Hose-Thread-Backflow-Preventer/dp/B0034YWADE/ref=pd_ts_hg_7?ie=UTF8&s=home-garden
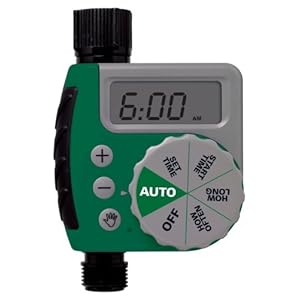

    Also, most drip irrigation systems are designed for a lower water pressure than your house likely receives.  If you’re super interested, you can get a water pressure gage (http://www.amazon.com/Rain-Bird-P2A-Water-Pressure/dp/B00004RACK/ref=pd_ts_hg_1?ie=UTF8&s=home-garden) and test the garden hose outlet you plan to use.  If it’s more than about 20 psi (pounds per square inch), you’ll also need to get a pressure reducer (http://www.amazon.com/Hose-Thread-Pressure-Reducer-PSI/dp/B0034YSDQM/ref=pd_ts_hg_8?ie=UTF8&s=home-garden). Oh...install the pressure reducer first, then the backflow preventer.  Now you’re ready for...


    Timing devices:  
    There’s about a dozen makes and models.  Some are for a single circuit (http://www.amazon.com/Orbit-91213-One-Dial-Garden-Digital/dp/B001RCTWZE/ref=pd_ts_hg_1?ie=UTF8&s=home-garden), 


    Think about the kinds of plants you have and what their watering needs are.  Some might require daily, others every 3-4 days.  You’ll need a timing device for each different timing you require.  You can use Y-adapters (http://www.amazon.com/Orbit-58248-Garden-Y-Connector-Shut-Off/dp/B000YDVRH8/ref=pd_ts_hg_16?ie=UTF8&s=home-garden) either after your backflow preventer to allow you to hook up multiple timers, or you can hook up Y-adapters on the outlet of your timer to send water in different directions after the timer.

    An important note:  You don’t want to suspend too much stuff from your garden hose outlet.  I ended up running a heavy duty short hose from the backflow preventer to the ground and then set up the timers on the ground.  Make sure it’s a good hose if you do this, because it will be charged (under pressure) all the time.  If it ruptures, there will be lots and lots of water on the ground...


    Water Backbone
    You can probably identify a reasonably straight line (or a few lines) that will get pretty close to most of your plants.  The plan is to run a reasonably large “backbone” or “header” on this line, and then tap that line to get water to your plants.

    If you have more than one timing device, make sure you get the right backbone to the right plants.  I use mostly 1/2 inch tubing (http://www.amazon.com/Irrigation-Premium-Grade-Polyethylene-Tubing/dp/B0035M3KCK/ref=pd_sbs_ol_1), for which many fittings are available:  T (http://www.amazon.com/Drip-Irrigation-Barbed-Poly-Tubing/dp/B0035LS97C/ref=pd_ts_hg_24?ie=UTF8&s=home-garden), elbow (http://www.amazon.com/Drip-Irrigation-Barbed-Elbow-Tubing/dp/B0035LTL5G/ref=pd_sim_ol_9), cap (http://www.amazon.com/1-2-Compression-End-Cap/dp/B0035XFWD4/ref=pd_ts_hg_23?ie=UTF8&s=home-garden), and brackets (can’t find a link...they’re available with all these other parts, trust me).


    An adapter is available to attach 1/2 inch tubing to standard garden hose (3/4 inch female pipe thread, http://www.homedepot.com/h_d1/N-5yc1vZ1xgc/R-100141505/h_d2/ProductDisplay?langId=-1&storeId=10051&catalogId=10053).  Oh, there’s a tool that cuts 1/2 inch pipe really well (http://www.amazon.com/Rain-Bird-Landscape-Dripline-TC-1PK/dp/B000FK01A4/ref=sr_1_fkmr2_2?ie=UTF8&qid=1279767676&sr=1-2-fkmr2), but you can probably find a different way.  Go nuts!
    tion: underline; vertical-align: baseline; white-space: pre-wrap;">


    Drippers, misters, and emittersr
     To get the water to the actual plants, I use 1/4-inch tubing. I use this tool (http://www.amazon.com/Rain-Bird-Landscape-Dripline-Watering/dp/B000FJX5PI/ref=sr_1_2?ie=UTF8&s=home-garden&qid=1279595764&sr=1-2) to tap into the “backbone” close to the plan.

    I attach one of these fittings (http://www.amazon.com/Raindrip-312050B-50PK1-Barb-Connector/dp/B002JLG3DQ/ref=sr_1_6?ie=UTF8&s=home-garden&qid=1279767188&sr=1-6) to an end of the tubing and poke the fitting into the hole I tapped.  I then cut the tubing to length with side cutters (http://www.amazon.com/Economy-Side-Flush-Cut-Pliers/dp/B001MOYU8Q/ref=sr_1_3?ie=UTF8&s=home-garden&qid=1279767600&sr=1-3) and attach a dripper (http://www.amazon.com/s/ref=nb_sb_noss?url=search-alias%3Dgarden&field-keywords=drip+irrigation+button+drippers+gph&x=0&y=0&ih=20_14_1_0_0_0_0_0_0_1.32_90&fsc=-1) or a mister (http://www.homedepot.com/h_d1/N-5yc1vZ1xgc/R-100143134/h_d2/ProductDisplay?langId=-1&storeId=10051&catalogId=10053).


    Oh, I keep it all reasonably neat with brackets (http://www.homedepot.com/Plumbing-Irrigation-Irrigation-Accessories/h_d1/N-5yc1vZ1xgcZbqli/R-100146056/h_d2/ProductDisplay?langId=-1&storeId=10051&catalogId=10053).


    Buy some drippers & misters that are larger and smaller than the ones you think you might need, so you can...

    Tune up!:  
    You’ll want to monitor closely for the first few days and weeks to make sure that your system is properly balanced.  I use a moisture sensor to see how all the plants are doing...probably best to check just before the next irrigation cycle is due.

    Seems like the plants should be on the dry side of the scale but not dusty or anything.  If all your plants are soggy, you might want to reduce the time on the timer.  If they’re all droopy, you might want to add some time to all.  If some are looking good while others are dry, you’ll want to use a larger dripper or mister on that specific plant.  You can also use 1/2 inch T’s (http://www.amazon.com/Barbed-Tee-Pack-50/dp/B00263C0RU/ref=pd_sim_ol_12) and put a separate dripper or mister in, if needed.  Turn on each timer manually for a few minutes and make sure that all the drippers/misters are working properly.


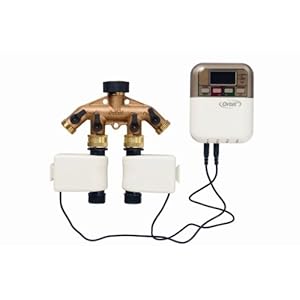
    For extra credit, you can install one of these http://www.homedepot.com/h_d1/N-5yc1vZ1xgc/R-100157124/h_d2/ProductDisplay?langId=-1&storeId=10051&catalogId=10053 to fertilize your plants periodically.  I’m sure you can figure it out.

    I hope this helps.  It’s a little bit of an investment up front in time and money, but really pays off with the ability to have lots of lovely plants that you know won’t be dead in two weeks!

    The Mr.

    ** zentMRS here - Did you enjoy The Mr's info? He's wicked smart. He'd be happy to answer any questions you might have. About irrigation or other stuff. (He didn't say that exactly, but I figure he will if you ask...) In the meantime, check out An Oregon Cottage for her weekly Garden Party.


    What's in YOUR garden this week?


    Zentmrs Pin It

    Monday, July 26, 2010

    Random Thoughts on Monday

    The Boy has pneumonia and can't go to his overnight camp this week.  He's pretty bummed.  But not as bummed as The Girl (who thinks the world is conspiring against her by giving The Boy pneumonia) who should be enjoying a week free from The Boy.

    We are growing mosquitos in our new pond.  Not intentionally.  Ugh.

    I love watching the birds at our feeders and bird bath.  This weekend we saw 18 finches on our finch feeder.  So we ordered one that would hold 24 finches.

    I'm enjoying re-reading James Rollins Sigma series books in preparation for the release of the next book in August.

    We had our quinoa dish on Sunday.  As I was making and watching FoodNetwork (we are kind of addicts) I saw two shows that featured quinoa dishes (Melissa d'Arabians $10 Dinners and The Next Food Network Star)!  I must be trendy.

    The Mr is working early hours (6:30 - 3:30) for another three weeks.  We carpool, so I work those hours too.  I am not a morning person.  And the cats are all off of their schedule.  Which makes sleep difficult.  We are looking forward to regular work hours.

    We watched "2012" this weekend.  I was underwhelmed. 

    We saw "Grown Ups" a week or so ago - loved it.  Assuming you go in with the right expectations.  Adam Sandler, Chris Rock, David Spade, Rob Schneider and Kevin James.  It was exactly the kind of movie you would expect them to make. 

    Still waiting for my sister's referral.  The waiting is interminable for me.  Worse for her.  Wish her well!

    That's all I have today.  Back to your regularly scheduled day.

    Zentmrs Pin It

    Sunday, July 25, 2010

    Sunday Snapshot: What We Did

    We started with a lovely brunch with the in-laws. Fritatta...


    ... and a craft beer (it was brunch at a brewery after all...)


    Then backyard tasks.  For a few weeks we have had a problem with our bird feeder.  Every night we fill up the feeder.


    And wake up the next morning to find the feeder empty, and the ground looking like this.  Seed-covered!


    We figured that it was probably not birds (as mostly birds don't come out at night) so it must be some kind of critter.  We don't get many squirrels (I've only ever seen one in our yard) but we probably have lots of other things running around in the night.  So we added a critter guard.  Hopefully it helps.


    And we put a spitting turtle in the pond.  Only to realize we need an additional part to make him spitting (ordered on the internet and due to arrive Tuesday).  But he looks cute in the meantime.


    All of this in order to have a peaceful retreat for this:


    That is what Sunday afternoons should be about.

    Ni Hao Y'all


    Zentmrs
    Pin It